各路 MySQL proxy 功能对比及性能评测
港真,写下这个文章题目的时候我自己都害怕,因为我对这些 proxy 完全不了解,而且我 TM 也没做过任何 MySQL 相关的性能测试 😂。凡事都有第一次,先列出四种 MySQL proxy (MySQL Proxy / Atlas / MaxScale / ProxySQL) 。
上述四个项目的主要目的都是作为代理将 MySQL 请求路由到后端 MySQL Server,从而做到读写分离,所以本文题目将它们统称为 MySQL proxy。MySQL Proxy 项目最早出现,并由 MySQL 组织维护,用 MySQL Proxy 作为项目的名字再自然不过了,本文用大小写区分两个术语,希望不会造成读者理解上的偏差。
各路 MySQL proxy 安装及简单使用
在 MySQL 主从复制实践一文中,笔者给出了主从复制的配置过程,本文复用之前的主从拓扑结构,并在新节点上部署各个 proxy:
| Name | ADDRESS | OS | MySQL |
|---|---|---|---|
| master | 10.0.63.202 | CentOS7 | Ver 14.14 Distrib 5.6.38 |
| slave | 10.0.63.203 | CentOS7 | Ver 14.14 Distrib 5.6.38 |
| proxy | 10.0.63.204 | CentOS7 | not necessary |
从提交历史来看,MySQL Proxy 项目已不再维护,github 项目主页给出的文档链接提示 Page Not Found,目前找到的最权威的文档是 mysql-proxy-en.pdf。
EPEL 源中含有 MySQL Proxy 包,可直接使用 yum 进行安装:
[root@proxy ~]# yum list | grep mysql-proxy
mysql-proxy.x86_64                      0.8.5-2.el7                    epel
mysql-proxy-devel.x86_64                0.8.5-2.el7                    epel
[root@proxy ~]# yum install -y mysql-proxy
[root@proxy ~]# mysql-proxy -V
mysql-proxy 0.8.5
  chassis: 0.8.5
  glib2: 2.36.3
  libevent: 2.0.21-stable
  LUA: Lua 5.1.4
    package.path: /usr/lib64/mysql-proxy/lua/?.lua
    package.cpath: /usr/lib64/mysql-proxy/lua/?.so
-- modules
  proxy: 0.8.5
运行 mysql-proxy --help-all 查看所有可用配置项,并创建配置文件:/etc/mysql-proxy.cnf (mod 0660)
[mysql-proxy]
## 注释不能跟在选项的后边 ##
# admin 用户名/密码,用于查看
admin-username = admin
admin-password = p4ssw0rd

admin-lua-script = /usr/lib64/mysql-proxy/lua/admin.lua
# 以守护进程运行
daemon = true
# 启动一个进程来监控 mysql-proxy 进程,如遇到 crash 监控进程会重启 mysql-proxy
keepalive = true
# 开启相应插件
plugins = proxy,admin

# 后端读写库地址
proxy-backend-addresses = 10.0.63.202:3306
# 后端只读库地址
proxy-read-only-backend-addresses = 10.0.63.203:3306

# 读写分离的脚本,每次连接都会调用该脚本,不利于性能
# wget https://raw.githubusercontent.com/mysql/mysql-proxy/mysql-proxy-0.8/lib/rw-splitting.lua
proxy-lua-script = /usr/lib64/mysql-proxy/lua/rw-splitting.lua

log-file = /var/log/mysql-proxy.log
# 日志级别
log-level = debug
启动及测试:
[root@proxy ~]# mysql-proxy --defaults-file=/etc/mysql-proxy.cnf
连接管理界面(4041端口),在任一台有 MySQL 客户端的机器上操作即可
➜  ~ mysql -h 10.0.63.204 --port 4041 -u admin -pp4ssw0rd
mysql: [Warning] Using a password on the command line interface can be insecure.
Welcome to the MySQL monitor.  Commands end with ; or \g.
Your MySQL connection id is 1
Server version: 5.0.99-agent-admin

Copyright (c) 2000, 2017, Oracle and/or its affiliates. All rights reserved.

Oracle is a registered trademark of Oracle Corporation and/or its
affiliates. Other names may be trademarks of their respective
owners.

Type 'help;' or '\h' for help. Type '\c' to clear the current input statement.

mysql> SELECT * FROM backends;
+-------------+------------------+---------+------+------+-------------------+
| backend_ndx | address          | state   | type | uuid | connected_clients |
+-------------+------------------+---------+------+------+-------------------+
|           1 | 10.0.63.202:3306 | up      | rw   | NULL |                 0 |
|           2 | 10.0.63.203:3306 | unknown | ro   | NULL |                 0 |
+-------------+------------------+---------+------+------+-------------------+
2 rows in set (0.00 sec)
测试代理功能则需要连接到4040端口
➜  ~ mysql -h 10.0.63.204 --port 4040 -uroot -p
Enter password:
Welcome to the MySQL monitor.  Commands end with ; or \g.
Your MySQL connection id is 13
Server version: 5.6.38-log MySQL Community Server (GPL)

Copyright (c) 2000, 2017, Oracle and/or its affiliates. All rights reserved.

Oracle is a registered trademark of Oracle Corporation and/or its
affiliates. Other names may be trademarks of their respective
owners.

Type 'help;' or '\h' for help. Type '\c' to clear the current input statement.

mysql>
MySQL Proxy 的强大的灵活性拜 Lua 引擎所赐。通过拦截客户端的请求或服务端的返回结果,进而使用 Lua 脚本来实现想要的结果,如上面配置的读写分离脚本(rw-splitting.lua),感觉这个设计逻辑跟 OpenResty 神似。
Lua 脚本中用户可用的函数钩子如下:
1. connect_server()         客户端连接服务端时该函数被调用,可用于实现 Load Balance
2. read_handshake()         初始握手信息从服务端返回时该函数被调用
3. read_auth()              当客户端将授权信息(用户名、密码、默认数据库)提交给服务器进行身份认证时,将调用此函数
4. read_auth_result()       服务端返回身份认证结果时,将调用此函数
5. read_query()             每当客户端向服务器发送一个查询时,就会调用该函数
6. read_query_result()      当服务端返回查询结果时该函数会被调用
7. disconnect_client()
读者只需要对着 MySQL Proxy 项目给出的 examples 看几个例子就能大致明白其设计逻辑了。
mysql-proxy-en.pdf 明确表明 MySQL Proxy 0.8.5 版本依然是 Alpha 版,不应该在生产环境使用。
Atlas 基于 MySQL Proxy(0.8.2) 修复了一些 bug 并进行了扩展,360 公司很多数据库业务会连接到 Atlas 平台,达到了百亿量级。
Atlas 在 github 上发布的 release 包没有 CentOS 7 相应版本,因此笔者直接从源码进行安装。
需要安装 glib-2.42.0 是从 DBProxy 安装手册那看到的
## 安装一些依赖
[root@proxy ~]# yum install -y mysql-devel jemalloc jemalloc-devel libevent-devel openssl-devel
## 安装 glib-2.42.0,centos7 默认的 glib 可能版本太高不被支持
[root@proxy ~]# wget http://pkgs.fedoraproject.org/repo/pkgs/mingw-glib2/glib-2.42.0.tar.xz/71af99768063ac24033ac738e2832740/glib-2.42.0.tar.xz
[root@proxy ~]# cd glib-2.42.0/
[root@proxy glib-2.42.0]# autoreconf -ivf
[root@proxy glib-2.42.0]# ./configure
[root@proxy glib-2.42.0]# make && make install
开始从源码安装 Atlas:
[root@proxy ~]# wget https://github.com/Qihoo360/Atlas.git
[root@proxy ~]# cd Atlas/
[root@proxy Atlas]# ./bootstrap.sh
[root@proxy Atlas]# make && make install
bootstrap.sh 中执行 ./configure 使用了 –prefix=/usr/local/mysql-proxy 选项,因此 altas 相关的文件都存储在 /usr/local/mysql-proxy 目录下。
Atlas 相对 MySQL Proxy 做了一些变动,所以配置项会有所不同(/usr/local/mysql-proxy/conf/test.cnf):
[mysql-proxy]

# admin 用户名
admin-username = admin
# admin 密码
admin-password = p4ssw0rd
# 不需要配置 admin.lua 及 插件
# admin-lua-script = /usr/local/mysql-proxy/lib/mysql-proxy/lua/admin.lua
# plugins = proxy,admin

# 以守护进程运行
daemon = true
# 启动一个进程来监控 mysql-proxy 进程,如遇到 crash 监控进程会重启 mysql-proxy
keepalive = true

# 处理事件的线程,一般设置为 CPU 核心数的两倍
event-threads = 4

# 实时日志记录,可设置为 ON/OFF/REALTIME
sql-log = REALTIME
# 只记录用时超过 10 ms 的查询,为了验证读写分离,可先不设置该选项,所有的查询都会写到日志
#sql-log-slow = 10

# Atlas监听的代理接口IP和端口
proxy-address = 0.0.0.0:1234
# Atlas监听的管理接口IP和端口
admin-address = 0.0.0.0:2345

charset = utf8

# 后端读写库地址
proxy-backend-addresses = 10.0.63.202:3306
# 后端只读库地址
proxy-read-only-backend-addresses = 10.0.63.203:3306
# 连接主从数据库所需用户名密码,使用 bin 目录下 `./encrypt mypassword`
pwds = root:RniWQKMXxQQ=

# 不需要设置读写分离的脚本
# proxy-lua-script = /usr/local/mysql-proxy/lib/mysql-proxy/lua/rw-splitting.lua

log-path = /usr/local/mysql-proxy/log
# 日志级别
log-level = debug
启动 Atlas(mysql-proxyd 是一个执行 mysql-proxy 的 shell 脚本):
[root@proxy ~]# /usr/local/mysql-proxy/bin/mysql-proxyd test start
登录管理界面查看 Atlas 状态及可使用的命令:
➜  ~ mysql -h 10.0.63.204 -P2345 -uadmin -pp4ssw0rd
mysql: [Warning] Using a password on the command line interface can be insecure.
Welcome to the MySQL monitor.  Commands end with ; or \g.
Your MySQL connection id is 1
Server version: 5.0.99-agent-admin

Copyright (c) 2000, 2017, Oracle and/or its affiliates. All rights reserved.

Oracle is a registered trademark of Oracle Corporation and/or its
affiliates. Other names may be trademarks of their respective
owners.

Type 'help;' or '\h' for help. Type '\c' to clear the current input statement.

mysql> select * from backends;
+-------------+------------------+-------+------+
| backend_ndx | address          | state | type |
+-------------+------------------+-------+------+
|           1 | 10.0.63.202:3306 | up    | rw   |
|           2 | 10.0.63.203:3306 | up    | ro   |
+-------------+------------------+-------+------+
2 rows in set (0.00 sec)

mysql> select * from help;
+----------------------------+---------------------------------------------------------+
| command                    | description                                             |
+----------------------------+---------------------------------------------------------+
| SELECT * FROM help         | shows this help                                         |
| SELECT * FROM backends     | lists the backends and their state                      |
| SET OFFLINE $backend_id    | offline backend server, $backend_id is backend_ndx's id |
| SET ONLINE $backend_id     | online backend server, ...                              |
| ADD MASTER $backend        | example: "add master 127.0.0.1:3306", ...               |
| ADD SLAVE $backend         | example: "add slave 127.0.0.1:3306", ...                |
| REMOVE BACKEND $backend_id | example: "remove backend 1", ...                        |
| SELECT * FROM clients      | lists the clients                                       |
| ADD CLIENT $client         | example: "add client 192.168.1.2", ...                  |
| REMOVE CLIENT $client      | example: "remove client 192.168.1.2", ...               |
| SELECT * FROM pwds         | lists the pwds                                          |
| ADD PWD $pwd               | example: "add pwd user:raw_password", ...               |
| ADD ENPWD $pwd             | example: "add enpwd user:encrypted_password", ...       |
| REMOVE PWD $pwd            | example: "remove pwd user", ...                         |
| SAVE CONFIG                | save the backends to config file                        |
| SELECT VERSION             | display the version of Atlas                            |
+----------------------------+---------------------------------------------------------+
16 rows in set (0.00 sec)
使用任一 MySQL 客户端连接到 Atlas(mysql -h 10.0.63.204 -P1234 -uroot -p),进行一些读写操作,可以在日志中验证读写分离(读可能发生在任一节点,写只发生在):
[root@proxy ~]# tailf /usr/local/mysql-proxy/log/sql_test.log
[01/16/2018 03:23:23] C:10.0.63.153:64485 S:10.0.63.202:3306 OK 2.357 "show databases"
[01/16/2018 03:23:41] C:10.0.63.153:64485 S:10.0.63.203:3306 OK 0.529 "SELECT DATABASE()"
[01/16/2018 03:23:41] C:10.0.63.153:64485 S:10.0.63.202:3306 OK 1.205 "show databases"
[01/16/2018 03:23:41] C:10.0.63.153:64485 S:10.0.63.202:3306 OK 0.650 "show tables"
[01/16/2018 03:24:06] C:10.0.63.153:64485 S:10.0.63.202:3306 OK 0.933 "show tables"
[01/16/2018 03:24:11] C:10.0.63.153:64485 S:10.0.63.202:3306 OK 0.945 "show tables"
[01/16/2018 03:24:17] C:10.0.63.153:64485 S:10.0.63.202:3306 OK 0.969 "show tables"
[01/16/2018 03:24:31] C:10.0.63.153:64485 S:10.0.63.203:3306 OK 1.183 "select * from user"
[01/16/2018 03:25:08] C:10.0.63.153:64485 S:10.0.63.202:3306 OK 1.591 "UPDATE `ums`.`user_device_phone` SET `system_version`='6.0.0.1' WHERE `device_id`='586c5f5220cf94f7f5599cc8ecea305f_android'"
[01/16/2018 03:25:35] C:10.0.63.153:64485 S:10.0.63.202:3306 OK 1.709 "UPDATE `ums`.`user_device_phone` SET `system_version`='6.0.0' WHERE `device_id`='586c5f5220cf94f7f5599cc8ecea305f_android'"
MaxScale 给我的第一感觉:文档好全啊!给人一种很舒服的感觉,相比起来 Atlas 让人有种年久失修的味道。MaxScale 提供 CenOS 7 rpm 安装包,安装也相对较简单。
[root@proxy ~]# wget https://downloads.mariadb.com/MaxScale/2.1.13/rhel/7/x86_64/maxscale-2.1.13-1.rhel.7.x86_64.rpm
[root@proxy ~]# rpm -ivh maxscale-2.1.13-1.rhel.7.x86_64.rpm
## 如果想查看包安装的具体位置,可以使用如下两条命令
[root@proxy ~]# rpm -qa | grep maxscale
maxscale-2.1.13-1.x86_64
[root@proxy ~]# rpm -ql maxscale-2.1.13-1.x86_64
对,这就安装好了。然后修改 MaxScale 的配置文件 /etc/maxscale.cnf
[maxscale]
threads=4

# Server definitions

[master]
type=server
address=10.0.63.202
port=3306
protocol=MySQLBackend

[slave]
type=server
address=10.0.63.203
port=3306
protocol=MySQLBackend

[Replication Monitor]
type=monitor
module=mysqlmon
servers=master,slave
user=root
passwd=11C5190BB4E13D66A50940AA3DC2DF7C
monitor_interval=10000

# Service definitions
# ReadWriteSplit documentation:
# https://github.com/mariadb-corporation/MaxScale/blob/2.1/Documentation/Routers/ReadWriteSplit.md

[Splitter Service]
type=service
router=readwritesplit
servers=master,slave
user=root
# 允许root用户连接,见 Ref 9
enable_root_user=1
passwd=11C5190BB4E13D66A50940AA3DC2DF7C
max_slave_connections=100%

# This service enables the use of the MaxAdmin interface
# MaxScale administration guide:
# https://github.com/mariadb-corporation/MaxScale/blob/2.1/Documentation/Reference/MaxAdmin.md

[MaxAdmin Service]
type=service
router=cli

# Listener definitions for the services
#
# These listeners represent the ports the
# services will listen on.
#

[Splitter Listener]
type=listener
service=Splitter Service
protocol=MySQLClient
# 使用IPv4, 非必需,见 Ref 8
# address=0.0.0.0
port=4006

[MaxAdmin Listener]
type=listener
service=MaxAdmin Service
protocol=maxscaled
socket=default
上述配置的含义这里不解释了,需要对 MaxScale 的基本概念有一定的理解。另外要注意的是上面的密码由 maxpasswd 生成,当启动 MaxScale 会去解密这个密码,这时候需要从 /var/lib/maxscale/.secrets 文件读取秘钥,如果生成这个秘钥文件的时候使用的是 root 用户,需要更改这个文件的 owner:
[root@proxy ~]# maxkeys
[root@proxy ~]# chown maxscale:maxscale /var/lib/maxscale/.secrets
[root@proxy ~]# maxpasswd mysql_password
11C5190BB4E13D66A50940AA3DC2DF7C
启动 MaxScale 服务并使用 maxadmin 查看状态:
[root@proxy ~]# systemctl start maxscale
[root@proxy ~]# maxadmin list services
Services.
--------------------------+-------------------+--------+----------------+-------------------
Service Name              | Router Module     | #Users | Total Sessions | Backend databases
--------------------------+-------------------+--------+----------------+-------------------
Splitter Service          | readwritesplit    |      1 |              1 | master, slave
MaxAdmin Service          | cli               |      2 |              2 |
--------------------------+-------------------+--------+----------------+-------------------

[root@proxy ~]# maxadmin list servers
Servers.
-------------------+-----------------+-------+-------------+--------------------
Server             | Address         | Port  | Connections | Status
-------------------+-----------------+-------+-------------+--------------------
master             | 10.0.63.202     |  3306 |           0 | Master, Running
slave              | 10.0.63.203     |  3306 |           0 | Slave, Running
-------------------+-----------------+-------+-------------+--------------------
[root@proxy ~]# maxadmin list listeners
Listeners.
---------------------+---------------------+--------------------+-----------------+-------+--------
Name                 | Service Name        | Protocol Module    | Address         | Port  | State
---------------------+---------------------+--------------------+-----------------+-------+--------
Splitter Listener    | Splitter Service    | MySQLClient        | *               |  4006 | Running
MaxAdmin Listener    | MaxAdmin Service    | maxscaled          | default         |     0 | Running
---------------------+---------------------+--------------------+-----------------+-------+--------
注:MaxAdmin 支持动态添加MySQL Server
使用 MySQL 客户端连接 4006 端口:
➜  ~ mysql -h 10.0.63.204 --port 4006 -uroot -p
Enter password:
Welcome to the MySQL monitor.  Commands end with ; or \g.
Your MySQL connection id is 51771
Server version: 5.5.5-10.0.0 2.1.13-maxscale MySQL Community Server (GPL)

Copyright (c) 2000, 2017, Oracle and/or its affiliates. All rights reserved.

Oracle is a registered trademark of Oracle Corporation and/or its
affiliates. Other names may be trademarks of their respective
owners.

Type 'help;' or '\h' for help. Type '\c' to clear the current input statement.

mysql>
ProxySQL 官网上说它比 MaxScale 强大,虽然文档的质量比 MaxScale 差了点,但它的 Star 数却是 MaxScale 的两倍。ProxySQL 也提供了主流发行版的源及二进制安装包。
同 MaxScale 一样,这里使用 rpm 安装包进行安装:
[root@proxy ~]# wget https://github.com/sysown/proxysql/releases/download/v1.4.4/proxysql-1.4.4-1-centos7.x86_64.rpm
## 安装依赖包
[root@proxy ~]# yum install "perl(DBD::mysql)"
[root@proxy ~]# rpm -ivh proxysql-1.4.4-1-centos7.x86_64.rpm
[root@proxy ~]# service proxysql start
Starting ProxySQL: DONE!
与 MaxScale 不同,ProxySQL 鼓励直接在命令接口来进行配置,而不是修改配置文件然后重启,这得益于 ProxySQL 独有的 Multi layer configuration system, 所以上面安装完了就直接启动了。当然它也有配置文件:/etc/proxysql.cnf。
通过命令接口配置读写分离:
[root@proxy ~]# mysql -u admin -padmin -h 127.0.0.1 -P6032 --prompt='Admin> '
Warning: Using a password on the command line interface can be insecure.
Welcome to the MySQL monitor.  Commands end with ; or \g.
Your MySQL connection id is 1
Server version: 5.5.30 (ProxySQL Admin Module)

Copyright (c) 2000, 2017, Oracle and/or its affiliates. All rights reserved.

Oracle is a registered trademark of Oracle Corporation and/or its
affiliates. Other names may be trademarks of their respective
owners.

Type 'help;' or '\h' for help. Type '\c' to clear the current input statement.

Admin>
ProxySQL 的全局配置都在 global_variables 表中。
Admin> set mysql-server_version='5.6.38';
Query OK, 1 row affected (0.00 sec)

Admin> select * from global_variables where variable_name in ('mysql-threads');
+---------------+----------------+
| variable_name | variable_value |
+---------------+----------------+
| mysql-threads | 4              |
+---------------+----------------+
1 row in set (0.00 sec)
增加 MySQL 服务器(group0: write; group1: read):
Admin> insert into mysql_servers(hostgroup_id, hostname, port) values (1, '10.0.63.202', 3306);
Query OK, 1 row affected (0.00 sec)

Admin> insert into mysql_servers(hostgroup_id, hostname, port) values (1, '10.0.63.203', 3306);
Query OK, 1 row affected (0.00 sec)

Admin> insert into mysql_servers(hostgroup_id, hostname, port) values (0, '10.0.63.202', 3306);
Query OK, 1 row affected (0.00 sec)

Admin> select * from mysql_servers;
+--------------+-------------+------+--------+--------+-------------+-----------------+---------------------+---------+----------------+---------+
| hostgroup_id | hostname    | port | status | weight | compression | max_connections | max_replication_lag | use_ssl | max_latency_ms | comment |
+--------------+-------------+------+--------+--------+-------------+-----------------+---------------------+---------+----------------+---------+
| 1            | 10.0.63.202 | 3306 | ONLINE | 1      | 0           | 1000            | 0                   | 0       | 0              |         |
| 1            | 10.0.63.203 | 3306 | ONLINE | 1      | 0           | 1000            | 0                   | 0       | 0              |         |
| 0            | 10.0.63.202 | 3306 | ONLINE | 1      | 0           | 1000            | 0                   | 0       | 0              |         |
+--------------+-------------+------+--------+--------+-------------+-----------------+---------------------+---------+----------------+---------+
3 rows in set (0.00 sec)
在表 mysql_query_rules 中添加读规则:
# 注意 select 规则的 apply 值为 0
Admin> INSERT INTO mysql_query_rules(active,match_pattern,destination_hostgroup,apply) VALUES(1,'^select',1,0);
Query OK, 1 row affected (0.00 sec)

Admin> INSERT INTO mysql_query_rules(active,match_pattern,destination_hostgroup,apply) VALUES(1,'^show',1,1);
Query OK, 1 row affected (0.00 sec)
在表 mysql_query_rules 中添加写规则:
Admin> INSERT INTO mysql_query_rules(active,match_pattern,destination_hostgroup,apply) VALUES(1,'^SELECT.*FOR UPDATE',0,1);
Query OK, 1 row affected (0.00 sec)

Admin> INSERT INTO mysql_query_rules(active,match_pattern,destination_hostgroup,apply) VALUES(1,'^update',0,1);
Query OK, 1 row affected (0.00 sec)

Admin> INSERT INTO mysql_query_rules(active,match_pattern,destination_hostgroup,apply) VALUES(1,'^truncate',0,1);
Query OK, 1 row affected (0.00 sec)

Admin> INSERT INTO mysql_query_rules(active,match_pattern,destination_hostgroup,apply) VALUES(1,'^savepoint',0,1);
Query OK, 1 row affected (0.00 sec)

Admin> INSERT INTO mysql_query_rules(active,match_pattern,destination_hostgroup,apply) VALUES(1,'^revoke',0,1);
Query OK, 1 row affected (0.00 sec)

Admin> INSERT INTO mysql_query_rules(active,match_pattern,destination_hostgroup,apply) VALUES(1,'^restore',0,1);
Query OK, 1 row affected (0.00 sec)

Admin> INSERT INTO mysql_query_rules(active,match_pattern,destination_hostgroup,apply) VALUES(1,'^reset',0,1);
Query OK, 1 row affected (0.00 sec)

Admin> INSERT INTO mysql_query_rules(active,match_pattern,destination_hostgroup,apply) VALUES(1,'^repair',0,1);
Query OK, 1 row affected (0.00 sec)

Admin> INSERT INTO mysql_query_rules(active,match_pattern,destination_hostgroup,apply) VALUES(1,'^rename',0,1);
Query OK, 1 row affected (0.00 sec)

Admin> INSERT INTO mysql_query_rules(active,match_pattern,destination_hostgroup,apply) VALUES(1,'^purge',0,1);
Query OK, 1 row affected (0.00 sec)

Admin> INSERT INTO mysql_query_rules(active,match_pattern,destination_hostgroup,apply) VALUES(1,'^lock',0,1);
Query OK, 1 row affected (0.00 sec)

Admin> INSERT INTO mysql_query_rules(active,match_pattern,destination_hostgroup,apply) VALUES(1,'^kill',0,1);
Query OK, 1 row affected (0.00 sec)

Admin> INSERT INTO mysql_query_rules(active,match_pattern,destination_hostgroup,apply) VALUES(1,'^grant',0,1);
Query OK, 1 row affected (0.00 sec)

Admin> INSERT INTO mysql_query_rules(active,match_pattern,destination_hostgroup,apply) VALUES(1,'^load',0,1);
Query OK, 1 row affected (0.00 sec)

Admin> INSERT INTO mysql_query_rules(active,match_pattern,destination_hostgroup,apply) VALUES(1,'^flush',0,1);
Query OK, 1 row affected (0.01 sec)

Admin> INSERT INTO mysql_query_rules(active,match_pattern,destination_hostgroup,apply) VALUES(1,'^alter',0,1);
Query OK, 1 row affected (0.00 sec)
定义 read/write hostgroups:
Admin> INSERT INTO mysql_replication_hostgroups (writer_hostgroup, reader_hostgroup) VALUES (0, 1);
Query OK, 1 row affected (0.00 sec)
添加访问后端的用户名密码:
Admin> insert into mysql_users(username, password) values ('root', 'password');
Query OK, 1 row affected (0.00 sec)
由于 ProxySQL 的多层配置系统,想要配置生效和持久化,需要运行如下命令:
Admin> LOAD MYSQL USERS TO RUNTIME;
Query OK, 0 rows affected (0.00 sec)

Admin> LOAD MYSQL SERVERS TO RUNTIME;
Query OK, 0 rows affected (0.00 sec)

Admin> LOAD MYSQL VARIABLES TO RUNTIME;
Query OK, 0 rows affected (0.00 sec)

Admin> LOAD MYSQL QUERY RULES TO RUNTIME;
Query OK, 0 rows affected (0.00 sec)

Admin> SAVE MYSQL USERS TO DISK;
Query OK, 0 rows affected (0.00 sec)

Admin> SAVE MYSQL SERVERS TO DISK;
Query OK, 0 rows affected (0.01 sec)

Admin> SAVE MYSQL VARIABLES TO DISK;
Query OK, 93 rows affected (0.00 sec)

Admin> SAVE MYSQL QUERY RULES TO DISK;
Query OK, 0 rows affected (0.00 sec)
然后就可以使用 MySQL 客户端来访问 ProxySQL 了:
➜  ~ mysql -h10.0.63.204 -P6033 -uroot -p
Enter password:
Welcome to the MySQL monitor.  Commands end with ; or \g.
Your MySQL connection id is 4
Server version: 5.5.30 (ProxySQL)

Copyright (c) 2000, 2017, Oracle and/or its affiliates. All rights reserved.

Oracle is a registered trademark of Oracle Corporation and/or its
affiliates. Other names may be trademarks of their respective
owners.

Type 'help;' or '\h' for help. Type '\c' to clear the current input statement.

mysql>
做一些操作,然后在 Proxy 的命令接口验证读写分离:
Admin> SELECT hostgroup hg, sum_time, count_star, digest_text FROM stats_mysql_query_digest ORDER BY sum_time DESC;
+----+----------+------------+-----------------------------------------------------------------------------+
| hg | sum_time | count_star | digest_text                                                                 |
+----+----------+------------+-----------------------------------------------------------------------------+
| 0  | 50006823 | 8          | show databases                                                              |
| 0  | 10001161 | 2          | SELECT DATABASE()                                                           |
| 0  | 7995955  | 2          | show databases                                                              |
| 0  | 6477     | 3          | UPDATE `ums`.`user_device_phone` SET `system_version`=? WHERE `device_id`=? |
| 0  | 6253     | 5          | show databases                                                              |
| 0  | 3358     | 2          | select * from ums.user                                                      |
| 0  | 3024     | 4          | show tables                                                                 |
| 1  | 2338     | 1          | show tables                                                                 |
| 1  | 2218     | 1          | show databases                                                              |
| 1  | 1345     | 1          | show databases                                                              |
| 1  | 1311     | 1          | show databases                                                              |
| 0  | 1303     | 1          | show tables                                                                 |
| 1  | 1187     | 1          | select * from ums.user                                                      |
| 0  | 1110     | 1          | select * from user                                                          |
| 0  | 974      | 2          | show ums.tables                                                             |
| 1  | 954      | 1          | show tables                                                                 |
| 1  | 813      | 1          | select * from ums.users                                                     |
| 0  | 543      | 1          | SELECT DATABASE()                                                           |
| 1  | 516      | 1          | SELECT DATABASE()                                                           |
| 1  | 497      | 1          | SELECT DATABASE()                                                           |
| 0  | 0        | 3          | select @@version_comment limit ?                                            |
+----+----------+------------+-----------------------------------------------------------------------------+
21 rows in set (0.00 sec)
如上就是对四种 MySQL proxy 的安装及简单使用。
各路 MySQL proxy 特性支持对比
由于 MySQL Proxy 官方不建议使用在生产环境,因此这里的特性对比将其忽略。
| Feature | Atlas | MaxScale | ProxySQL |
|---|---|---|---|
| Star(20180115) | 3274 | 767 | 1586 |
| 文档 | 3分 | 5分 | 4分 |
| 项目活跃度 | 3分 | 4分 | 4.5分 |
| 高可用 | 与LVS并用 | Pacemaker/Corosync | ProxySQL Cluster |
| 企业支持 | ✅ | ||
| 并发处理 | 线程池 | epoll | 线程池 |
| 读写分离 | ✅ | ✅ | ✅ |
| 负载均衡 | 支持权重 | 支持权重 | 支持设置hostgroup中Server的权重 |
| 失败重启 | ✅ | ✅ | ✅ |
| IP 过滤 | ✅ | 通过设置用户权限 | 通过设置用户权限 |
| 分库查询 | ✅ | ✅ | ✅ |
| 在线配置 | ✅ | ✅ | ✅ |
以上就是笔者对三个常用 MySQL proxy 特性的简单对比,可以看出,虽然 MaxScale 和 [ProxySQL][proxy] 项目的 ✨ 不如 Atlas 多,但是就文档的标准程度和项目的活跃度来说,Atlas 就显得有点逊色了。如果单从上面的特性对比来做技术选型,笔者更倾向与后两者。
ProxySQL 官网有关于 MaxScale 和 ProxySQL 详细的特性对比,读者不妨一看:Compare。
性能测试
测试拓扑结构如下图所示,由于使用的端口不一样,三个 MySQL proxy 都运行在同一台 Proxy Server 上,
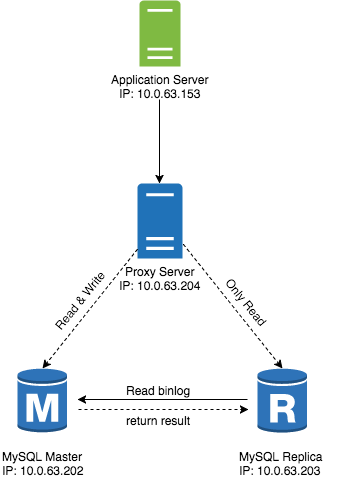
端口使用情况如下:
| / | Atlas | MaxScale | ProxySQL |
|---|---|---|---|
| admin port | 2345 | unix socket | 6032 |
| proxy port | 1234 | 4006 | 6033 |
使用 sysbench 进行测试,由于上图中的机器都不是独占的,在进行测试的时候可能会有很多其它程序运行在机器之上,因此这里不会列出机器的配置,三个 MySQL proxy 连接的是同一组 MySQL 主从库,且事件处理线程都设置为4,本文通过测试来对三个程序做一个横向的对比,不涉及性能损耗的测试,就酱。🤔
首先创建数据库,连接任何一个 proxy 做如下操作:
mysql> create database sbtest;
Query OK, 1 row affected (0.01 sec)
准备测试数据
准备数据也是任一连一个 proxy 然后将测试数据写入到上面的新创建的 sbtest 数据库(sysbench 默认使用 sbtest 库进行测试):
➜  ~ sysbench --db-driver=mysql --table-size=100000 --tables=24 --threads=4 \
--mysql-host=10.0.63.204 --mysql-port=4006 --mysql-user=root --mysql-password=sqlpassword \
oltp_read_write prepare
sysbench 1.0.11 (using bundled LuaJIT 2.1.0-beta2)

Initializing worker threads...

Creating table 'sbtest2'...Creating table 'sbtest1'...Creating table 'sbtest3'...


Creating table 'sbtest4'...
Inserting 100000 records into 'sbtest1'
Inserting 100000 records into 'sbtest4'
Inserting 100000 records into 'sbtest2'
...
进行测试:
## Atlas

➜  ~ sysbench --db-driver=mysql --table-size=200000 --tables=24 --threads=4 --time=120 \
--mysql-host=10.0.63.204 --mysql-port=1234 --mysql-user=root --mysql-password=mysql_password \
 oltp_read_write run
sysbench 1.0.11 (using bundled LuaJIT 2.1.0-beta2)

Running the test with following options:
Number of threads: 4
Initializing random number generator from current time


Initializing worker threads...

Threads started!

SQL statistics:
    queries performed:
        read:                            98840
        write:                           28240
        other:                           14120
        total:                           141200
    transactions:                        7060   (58.80 per sec.)
    queries:                             141200 (1176.08 per sec.)
    ignored errors:                      0      (0.00 per sec.)
    reconnects:                          0      (0.00 per sec.)

General statistics:
    total time:                          120.0577s
    total number of events:              7060

Latency (ms):
         min:                                 42.58
         avg:                                 68.00
         max:                                251.61
         95th percentile:                    155.80
         sum:                             480113.03

Threads fairness:
    events (avg/stddev):           1765.0000/7.18
    execution time (avg/stddev):   120.0283/0.01


## MaxScale

➜  ~ sysbench --db-driver=mysql --table-size=200000 --tables=24 --threads=4 --time=120 \
--mysql-host=10.0.63.204 --mysql-port=4006 --mysql-user=root --mysql-password=mysql_password \
 oltp_read_write run
sysbench 1.0.11 (using bundled LuaJIT 2.1.0-beta2)

Running the test with following options:
Number of threads: 4
Initializing random number generator from current time


Initializing worker threads...

Threads started!

SQL statistics:
    queries performed:
        read:                            118734
        write:                           33924
        other:                           16962
        total:                           169620
    transactions:                        8481   (70.65 per sec.)
    queries:                             169620 (1413.05 per sec.)
    ignored errors:                      0      (0.00 per sec.)
    reconnects:                          0      (0.00 per sec.)

General statistics:
    total time:                          120.0358s
    total number of events:              8481

Latency (ms):
         min:                                 39.88
         avg:                                 56.60
         max:                                459.62
         95th percentile:                     68.05
         sum:                             480038.36

Threads fairness:
    events (avg/stddev):           2120.2500/15.94
    execution time (avg/stddev):   120.0096/0.01


## ProxySQL

# 测试遇到错误,已提交 ISSUE
# https://github.com/sysown/proxysql/issues/1337

# ---- 20180118 更新 ---- #
# 上面的 issue 已经确认,是准备数据的时候主从库同步的时候有延迟

➜  ~ sysbench --db-driver=mysql --table-size=200000 --tables=24 --threads=4 --time=120 \
--mysql-host=10.0.63.204 --mysql-port=6033 --mysql-user=root --mysql-password=mysql_password \
 oltp_read_write run
sysbench 1.0.11 (using bundled LuaJIT 2.1.0-beta2)

Running the test with following options:
Number of threads: 4
Initializing random number generator from current time


Initializing worker threads...

Threads started!

SQL statistics:
    queries performed:
        read:                            99190
        write:                           28340
        other:                           14170
        total:                           141700
    transactions:                        7085   (59.01 per sec.)
    queries:                             141700 (1180.18 per sec.)
    ignored errors:                      0      (0.00 per sec.)
    reconnects:                          0      (0.00 per sec.)

General statistics:
    total time:                          120.0646s
    total number of events:              7085

Latency (ms):
         min:                                 45.78
         avg:                                 67.77
         max:                                267.51
         95th percentile:                    102.97
         sum:                             480133.57

Threads fairness:
    events (avg/stddev):           1771.2500/11.84
    execution time (avg/stddev):   120.0334/0.02
多次测试结果显示在性能上 MaxScale 要更胜一筹,且 MaxScale 的可配置性介于 Atlas 和 ProxySQL 之间,社区比较活跃,所以如果做技术选型的话笔者会首选 MaxScale。
20180124 更新
在实际使用 MaxScale 的过程中遇到了所有的查询都路由到 master 节点的问题,原因在于 MaxScale 的一些限制:
Read queries are routed to the master server in the following situations:

    if they are executed inside an open transaction

    in case of prepared statement execution

    statement includes a stored procedure, or an UDF call

    if there are multiple statements inside one query e.g. INSERT INTO ... ; SELECT LAST_INSERT_ID();
我们在使用 JPA 的时候使用的都是 prepared statement,因此会被 MaxScale 全部路由到 master。 笔者在 MaxScale 邮件列表中询问了此问题: Limitations in the Read/Write Splitter,也得到了开发者的回答,在之后发布的 MaxScale 2.2 版本 prepared statement 会像正常查询一样被分流到不同节点。